Designing a Custom Calendar Layouts & Resources
Designing a Custom Calendar Layouts & Resources
Creating a custom calendar is not only a great way to express creativity but also a fantastic tool for branding, organizing, or gifting. Whether you want to design a personalized calendar for your business or for personal use, it’s important to have a clear understanding of layout, design elements, and the right resources. This guide will walk you through the steps to design your own custom calendar, providing practical tips and showcasing layouts and resources for a professional touch.
Why Create a Custom Calendar?
A custom calendar offers several benefits:
- Brand Visibility: It’s an excellent marketing tool for businesses, showcasing your brand’s identity and keeping it top of mind throughout the year.
- Personalization: It allows you to add personal or business-specific events, messages, and visual elements.
- Memorable Gifts: Custom calendars make thoughtful, functional gifts, especially when personalized with family photos or special dates.
Key Elements of a Professional Calendar Design
Before diving into the design process, it’s essential to understand the elements that make up a calendar:
- Structure: A calendar is built around a grid that displays months, weeks, and days. The layout must be functional yet visually pleasing.
- Typography: Fonts should be readable at a glance, especially for the dates. Use contrasting fonts for headings, months, and holidays.
- Images: Custom calendars offer the opportunity to showcase photos, designs, or branded visuals. These should be high-quality, cohesive with the calendar’s theme, and in sync with the overall design.
- Color Palette: Your color choices should align with the purpose of the calendar. For corporate calendars, stick with brand colors. For personal calendars, choose a palette that complements your photos or graphics.
- Special Dates: You can highlight key dates, such as public holidays, company events, or personal milestones, making the calendar more functional and personalized.
Step-by-Step Guide to Designing Your Custom Calendar
1. Choose a Theme or Purpose
Decide whether the calendar will serve a personal or professional purpose. For businesses, the calendar could reflect your brand’s ethos or highlight product launches. For personal use, you might want to feature family photos or important dates. A clear theme helps guide your design choices and keeps the look consistent.
2. Select the Calendar Format
There are various formats to choose from:
- Wall Calendars: Best for displaying larger images, ideal for personal or promotional use.
- Desk Calendars: More compact, usually with a monthly view. Great for office settings or practical gifting.
- Digital Calendars: For social media or email marketing. Interactive digital calendars are becoming increasingly popular.
- Planner-style Calendars: Offer more room for notes, making them ideal for organizing day-to-day activities.
Choose the format that best fits your needs and your audience’s preferences.
3. Pick Your Design Software
You don’t need to be a professional designer to create a custom calendar. There are user-friendly tools and software that make the process easy:
- Canva: An excellent choice for beginners, offering drag-and-drop functionality and plenty of calendar templates.
- Adobe InDesign: Ideal for more advanced users who want full control over the layout and typography.
- Microsoft Publisher: A good middle-ground for professionals and beginners, offering basic calendar templates with room for customization.
Each of these platforms provides a variety of templates, making the design process smoother.
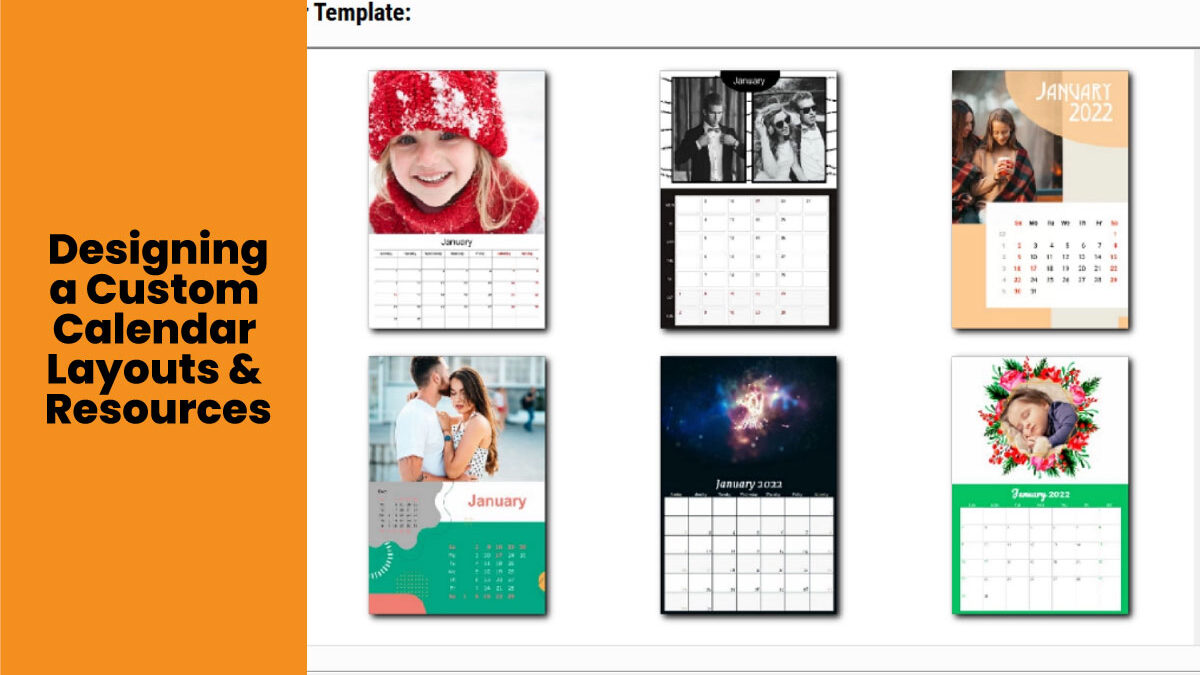
4. Design Your Layout
Start by selecting or creating a template. Here are some layout tips:
- Grid Layout: Ensure the grid is clean and easy to follow. You can use different colored blocks to differentiate between weekdays and weekends.
- Header and Footer: Allocate space for a header that includes the month and a footer that can be used for company logos, inspirational quotes, or key dates.
- Photo Placement: If you’re incorporating photos, align them at the top of the calendar or have them as a full-page background with the calendar grid overlaid. Keep in mind that the photos should be high resolution (300 DPI or more) for print quality.
- Spacing: Give your design enough breathing room. Avoid overcrowding the grid with too many details or images, as it can make the calendar difficult to read.
5. Incorporate Special Events and Branding
For businesses, include key company dates such as product launches, holidays, or important events. If it’s a personal calendar, mark family birthdays, anniversaries, or other significant events. Don’t forget to incorporate your brand’s logo and contact information if it’s a corporate calendar. This is essential for brand visibility.
6. Proof and Print
Before finalizing your design, ensure all the dates, holidays, and special events are accurate. Double-check for spelling errors, and make sure the images and colors are cohesive. If you’re designing for print, ensure you use the correct dimensions and resolution.
For printing, you can choose local printers or online services like Vistaprint, Shutterfly, or Printful, depending on your location and needs.
Design Resources for Custom Calendars
Here are some essential tools and resources for creating custom calendars:
- Stock Photo Websites: If you’re looking for high-quality images to use, websites like Unsplash, Pexels, and Shutterstock offer free and premium stock photos.
- Icon Libraries: For adding visual elements such as icons or graphics, check out Flaticon or IconFinder.
- Font Resources: Typography is crucial in calendar design. Use free font libraries like Google Fonts or premium services like Adobe Fonts for more professional typefaces.
- Color Palettes: Tools like Coolors.co or Adobe Color can help you find the perfect color combinations for your calendar design.
Conclusion
Designing your own custom calendar is a creative way to stay organized and showcase your style or brand. By following the tips and layout guidelines in this guide, you can create a professional-looking calendar that meets your needs. Whether it’s for personal use, gifting, or brand promotion, the key is to maintain a balance between aesthetics and functionality. Leverage the available tools and resources to streamline your design process and create a calendar that will stand out all year long.


